Tutorial on making gemstone powder wings
In India, there is a technique devised by artisans who use semi-precious gemstone powder to do some wonderful paintings. Semi-precious stones such as malachite, turquoise, lapis lazuli, various types of agate, etc are crushed, blended with a medium and then used as one uses paint. Of course, the gemstone powders are not ground to the degree of fineness of paint pigments, as the ultimate texture depends on the hardness of the mineral used, but suffice it to say, it is an extremely interesting arts and craft medium.
I am lucky to be living in India, and happy that I came across these wonderful powders. They can be used in several ways and so far, I have experimented successfully using these to make fairy wings and to embellish lace for an interesting embossed and totally unusual effect.
Well, what are we waiting for, lets get started.
Materials


From the above pictures, you will see that I have used the following:
Acrylic Gloss Medium - I've used the locally available version, but any reasonably liquid acrylic medium or binder will suffice.
Liquitex Pearlescent Medium - I bought this from http://www.jerrysartarama.com/ and it is a full bodied acrylic medium which one can mix with any paint to give it an iridescent look.
Sobo Glue - A light bodied glue which binds the gemstone powders. The great thing about this glue is that it dries clear bringing out the colour of the powders fully. This was purchased from www.polymerclayexpress.com.
Fimo Decorating Gel - A wonderful gel which bakes to a transparent finish. Perfect for making gemstone wings. This was purchased from www.polymerclayexpress.com.
Faux Dichro Liquid Glass - I use this to seal the wings. It dries in about an hour to a wonderful glass finish and protects and seals the powders. I got this product at www.firemountaingems.com. You could use any suitable sealer or even several thin coats of varnish to seal and protect your wings. Just run a test first.
Gemstone Powder Vials - These powders were selected in earth tones to match my earth faerie. I've used brown and white agate. These can be purchased at http://www.magicminiatures.com/gemstone.htm.
Artistic Wire 24 gauge - Also purchased from www.polymerclayexpress.com.
In addition to these supplies, you will also need glitter, pearl-ex powders, glass-liner, wire cutters, scissors, heat proof tape, paper, a piece of glass that fits in your oven. (Mine did not and had to be cut AFTER the wings were on it. It was quite a mess)
Step-by-Step Procedure to Wing Creation
Trace, draw or print your wing pattern on paper

Draw or print out any suitably sized wing design on paper. You can browse the net for butterfly wing images and trace the outlines of these for some wonderfully realistic wings. You may have to resize them in order to match the size of your faerie. Once you have your wing pattern, lay a piece of glass over it.
Building a wire armature

Look at your pattern and go over any two areas of each wing using your wire. This strengthens the wing, helps you attach it to your faerie and makes it possible to pose the wings. If the wing is very large, use three wires on each wing, adding additional strength to the bottom of the wing as well. Please remember to make sure that your wire lies flat on the surface of the glass. You may need to fiddle and bend it a little. Once you are happy with how the wire is bent tape it in place, without getting any tape over the pattern. I've used ordinary scotch tape here, but the correct tape to use would be a heat resistant duct tape.
Filling in the wings with Fimo Decorating Gel

What I am doing is clear from the above picture. Just fill in the shape of the wing with your liquid Fimo. The product is reasonably viscous, so it will not spread all over the glass. Use a thin coat and make sure you go over the wires completely. You don't have to worry too much about the outline of the wings. Going outside the main border of the wings at this stage is fine, because you will be trimming the wings later.

You get an idea from the above picture as to how the wings will look once covered with the liquid Fimo.
Baking your wings

Bake your wings as per manufacturers directions. Do not put your paper pattern into the oven by mistake. In my case I bake for 15 to 20 minutes once my oven has reached a temperature of 130 degrees Celsius. Please use an oven thermometer as a lot of ovens have calibration problems. You can see from the above picture that the wings have turned transparent after they have been baked.
Outlining your wings

The wing design now has to be worked on the wing with glass liner. Use any suitable glass liner of a colour which matches your doll. I've used what is locally available, and although I like the consistency of this particular brand of liner, I don't like the colour. It is a rather pale shade of gold. Later on, I will paint over to darken it, so that it is more to my liking and matches my faerie better. Once you have added your liner, let it dry for an hour or so.
Mixing your gemstone powders

I have used brown agate gemstone powder, with some coppery pearl-ex powder, liquitex pearlescent medium and sobo glue. Both the liquitex and sobo glue are somewhat thick so I will need to use my liquid acrylic medium to thin it down a little. You need very little gemstone dust for this, and a vial is enough for several pairs of wings.

You can see once I have added the acrylic medium, (which has a milk like colour and consistency) it will be so much easier to mix and blend everything together.

This is the consistency you have to achieve. It is not too liquid, and you and you can pick it up on your brush easily and fill it into your wing design in a reasonably thick layer.

Sections of the wing have been painted with the mixture. The colour at this stage is lighter than what it will be because the wet Sobo Glue is now white, but will dry to colorless soon. My acrylic binder is white, you may use a colorless one if you wish, which will darken the wing further. If you don't like the colour, feel free to add a touch of paint or any suitable liquid dye to it. Remember that colorfastness is not an issue as you will be sealing the whole thing later. Now that the brown is added, let us proceed to add the other colors.

The next color of choice is white. I've added a bit of silver pearl-ex to it. As before, make your mixture of glue and binders.

Add your liquid medium to the mixture.

Mix well until the consistency is like shown in the picture. Remember that it should not be too liquid as you will have to keep building up layers if that is the case.
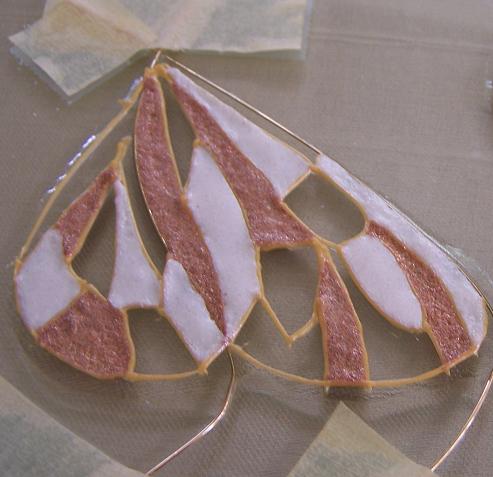
I have painted in the white sections. You can see that the brown has begun to darken and dry, and has a wonderful stone like effect.

Since the white agate takes colour beautifully. I have used whatever white agate mixture was left and added some gold and coppery powders to it.

You may need to add some more glue, binder and medium as the case may be.

This is the consistency you are looking for.

Picture of the wing with the gold sections painted in.
Finishing your wings

As I mentioned earlier, since I did not quite think the color of the glass liner would match my faerie, I went over the lined sections with a nice coppery color. Since these wings were for my earth faerie, it serves to compliment her coloring perfectly. The wing at the bottom of the picture has been painted over. You can see better definition in it as against the one on top. Feel free to experiment with color, a black outline can bring about a dramatic effect.

The wings are finished and sealed. Wait for the sealer to dry and remove the tape and gently peel off the wings from the glass. You can do this quite easily by holding on to the wire.
Trim any excess Fimo from around the wing with a sharp pair of scissors. Cut the wires on the outsides of the wings, but keep those on the inside as these will have to be twisted together and inserted into a hole drilled in the faerie's back.
A picture of the finished wings on Dharti, my earth elemental Faerie. The sealer tarnished the gold on the wings to a wonderful shade of green, but it matched her so perfectly that I was delighted with the results.

You can see further images of Dharti at http://www.magicminiatures.com/Dharti.htm.


I have included pictures of other wings I have made using this exact technique. These pictures illustrate what I mean when I have mentioned the wires on the outer side of the wings are snipped off and the ones on the inside are twisted together. The twist is clear on the pair of turquoise wings above.
Conclusion
I hope you enjoyed this tutorial. With a little imagination and lots of enthusiasm, I am sure you will be able to make some wonderful wings and use gemstone powders in several other projects.